Ball Pressure Test of IEC 60695-10-2
Test Goal: To simulate the thermal stress with pressure.
Application: Up to the end product standards and not for PCB, ceramic or wires.
For EN 60598-1: 2000:
• External parts of insulating material providing protection against electric
shock, and parts of insulating material retaining current-carrying parts or
SELV parts in position shall be sufficiently resistant to heat.
• This test does not have to apply to plastic parts, which provide supplementary
insulation.
Test specimen:
If possible, cut a specimen from the product in such a way that a test piece at least 2,5mm thick with approximately parallel upper and lower surface is obtained.
If necessary, the thickness may be attained by stacking two or more sections.
If it is not possible to cut a specimen parallel surfaces, care shall be taken to support the area of the specimen directly under the ball.
If is impracticable to use a specimen from the product then a plaque of identical material may be used as the specimen. The specimen shall have a thickness of 3,0mm+ 0,5mm and at least a square with 10mm sides or a diameter of at least 10 mm.
Conditioning for specimen: 15oC – 35oC; 45 – 75 % RH; for 24 h.
Test procedure:
1. The test shall be made in a heating cabinet at a temperature specified in the relevant standards, with a tolerance of + 2oC. Measure the temperature as close as possible to the test specimen.
The temperature in heating cabinet shall always be measured at the hottest accessible spot, which is usually on the inside of the enclosure, at normal operation.
2. Before introducing the specimen, bring the test apparatus to the temperature required and maintain the apparatus at this temperature for 24 h or until equilibrium conditions are reached, which occurs sooner.
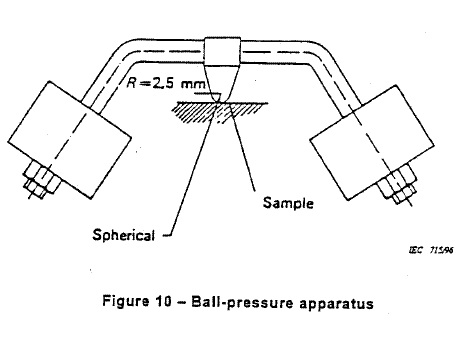
3. Place the specimen in the cabinet, support the specimen on a stainless steel block, with adequate dimension, so that its upper surface is horizontal and the steel ball is pressed against this surface with a force of 20N+ 0,2N. Take care to ensure the ball does not move during the test. A suitable apparatus is shown in figure 10.
4. After 60 +2/-0 min, removed the ball and immerse the specimen in ambient temperature water within 10 s. Allow the specimen to cool to approximately room temperature for no longer than 10 min and remove all traces of water.
5. Within 3 min after removal from water, measure the diameter of the indentation caused by the ball to one decimal place. In case of doubt, make two further tests and measure the diameter of the indentation to one decimal place; both of these tests shall meet the requirements.
The diameter is measured by a lens (approximate magnification of 10x) equipped with a reticule, a cross-travel measuring table (accuracy 0,01 mm) and a lighting device to enable the illumination of the surface of test specimen. For measuring the diameter, the reticule is moved from one side to the other. Indicate on the report the longest measurement observed(maximum allowed difference between the longest and shortest measurement: 0,2mm).
Evaluation of test result:
The result is expressed as a pass if the diameter of the indentation does not exceed
2,0mm.
Relevant specification:
1. any conditioning required;
2. the surface to be tested and the point(s) of application;
3. the temperature at which the test is carried out.
Test apparatus:

